Nothing matches. Try a shorter word, or choose a topic.
Getting started
No. It is a player. You add the playlist from your own IPTV provider, and the app plays it. Zee2 includes no channels, films or shows.
Say “Zee Two”. It is written Zee2, with the digit, on this site and in the apps.
Xtream Codes accounts (a server address, a username and a password) and M3U or M3U8 playlist links. The iPhone, iPad and Android apps can also read an M3U file from the device. The TV app cannot import files.
Zee2 Player shows no ads, has no in-app purchases and takes no payments. Your IPTV provider charges for the channels and films, and that is a separate agreement with them.
iPhone and iPad
- Open Settings, then Manage Playlists, then Add Playlist. On a first run, tap Add Playlist on the first screen.
- Under Source choose Xtream Codes and fill Server Address, Username and Password. Or choose M3U Link and paste the Playlist Link. Or choose Imported File and tap Choose an M3U File.
- Type a Name, then tap Save.
Android phone and tablet
- Open Settings, then Playlists, then Add a playlist. On a first run, tap Add your playlist.
- Choose Xtream account and fill Server address, Username and Password. Or choose Playlist URL and paste the link. Or choose From this device and tap Choose an M3U file.
- Tap Add playlist. The app fetches your catalogue and keeps going in the background.
Smart TV
- On a first run you see Add your playlist. Later, open Settings, then Playlists, then Add playlist.
- With the arrow keys choose Xtream login or M3U link. Press OK on each row to open the on-screen keyboard, type, and choose Done.
- When every row is filled, choose Connect and press OK.
- Faster: link a phone that already has your playlist, and it arrives on the TV. You then type only the password.
Your password is kept in the device’s secure storage and is never sent to another device.
iPhone and iPad
- Open Settings, then Manage Playlists.
- Swipe the playlist row left and tap Edit, or touch and hold it and choose Edit.
- Change what you need and tap Save.
Android phone and tablet
- Open Settings, then Playlists.
- Tap Edit on the playlist.
- Change what you need. Leave the password empty to keep the saved one. Tap Save.
Smart TV
- Open Settings, then Playlists.
- On the playlist’s row choose Edit.
- Change what you need. Leave the password empty to keep the saved one. Choose Save.
If you change the server address or the username, the app treats it as a different playlist and offers to replace the old one. The old one’s favourites and history are removed from the device.
iPhone and iPad
- Open Settings, then Manage Playlists.
- Swipe the playlist left and tap Delete, then confirm with Delete Playlist.
Android phone and tablet
- Open Settings, then Playlists.
- Tap Remove on the playlist and confirm.
Smart TV
- Open Settings, then Playlists.
- On the playlist’s row choose Delete and confirm with Delete.
This removes the playlist’s channels, guide, favourites, history and saved password from this device only. Your provider account is not touched.
iPhone and iPad
- Open Settings and tap Update Now.
Android phone and tablet
- Open Settings and tap Update now. To stop, tap Stop updating.
Smart TV
- Open Settings and choose Refresh playlist now.
A large playlist can take a while and use a lot of data.
iPhone and iPad
- Open Settings, then Manage Playlists.
- Tap the playlist you want. The one with a check mark is in use. You can also touch and hold it and choose Use This Playlist.
Android phone and tablet
- Open Settings, then Playlists.
- Tap Use this playlist on the one you want. The one marked Active is in use.
Smart TV
- Open Settings, then Playlists.
- On the playlist’s row choose Open. The one marked Active is in use.
Each playlist keeps its own favourites and history.
Live TV and guide
iPhone and iPad
- Open the Live TV tab, choose a folder (or all channels) and tap a channel.
- In the player, tap Previous or Next, or open Channels to pick from a list.
Android phone and tablet
- Open the Live TV tab, choose a folder and tap a channel.
- In the player, tap Previous channel or Next channel, or open Channels to pick from a list.
Smart TV
- Choose Live in the left menu. Move to a channel and press OK to preview it. Press OK again for full screen.
- To change channel, press Up or Down, or CH+ and CH-. A banner shows the channel for a moment.
- Press Back once to return to the preview, and again to go back to the list.
iPhone and iPad
- On the Home tab tap TV Guide.
- Use the day chips at the top to move between days. Tap a programme to see its details.
Android phone and tablet
- Open the Live TV tab and tap Guide at the top.
- Scroll the timeline. Tap a programme to see its details, or a channel name to watch it.
Smart TV
- Choose Live in the left menu and move to the Guide button, then press OK.
- Move across the programmes. Press OK on one to open its details, then Watch channel to watch.
If a provider offers no guide, you can add a guide address in Settings. The guide comes from your provider or from an address you add.
iPhone and iPad
- Open TV Guide and go to a programme that has finished.
- Tap it, then tap Play Recording.
Android phone and tablet
- Open Live TV, then Guide.
- Tap a programme that has finished, then tap Try catch-up.
Smart TV
- Open Live, then the guide, and go to a programme that has finished.
- Press OK, then choose Watch from the start.
Catch-up only works if your provider keeps an archive for that channel. The button is a hint, and a recording may still not play.
Movies, series and search
iPhone and iPad
- Open the Movies or Series tab and tap a title.
- Tap Play. If you stopped part-way you see a Resume button, and Play from the Start.
- For a series, pick a season and tap an episode.
Android phone and tablet
- Open the Movies or Series tab and tap a title.
- Tap Play, or Resume from %1$s if you stopped part-way, or Play from the Start.
- For a series, pick a season and tap Play episode.
Smart TV
- Choose Movies or Series in the left menu and press OK on a title.
- Choose Play, or the Resume button, or Start over.
- For a series, pick a season and an episode. CH+ goes to the next episode.
iPhone and iPad
- On the Home tab tap the search field and type at least two letters.
- Results are grouped into Channels, Movies, Series and Folders. Each of the Live TV, Movies and Series tabs also has its own search field.
Android phone and tablet
- On the Home tab tap Search your library and type at least two letters.
- Results are grouped into channels, movies, series and folders. In a tab, the search field searches that tab. Tap Search Everything to widen it.
Smart TV
- Choose Search at the top of the left menu.
- Pick letters on the on-screen keyboard. Results appear grouped by folders, channels, movies and series.
- If your TV is linked to a phone with the app open, you can type on the phone instead.
Search runs on your device. Titles hidden by parental controls stay out of the results.
Continue Watching, history, favourites and hiding
iPhone and iPad
- On the Home tab touch and hold the title in the Continue Watching row.
- Choose Remove from Continue Watching.
Android phone and tablet
- On the Home tab touch and hold the title in the Continue watching row.
- Choose Remove from Continue Watching.
Smart TV
- On Home go to the Continue watching row and press Up from a title to reach Remove from continue watching. Press OK.
- Press OK on each title to remove, then OK on Done.
iPhone and iPad
- On Home touch and hold the title in the History row.
- Choose Remove from History.
Android phone and tablet
- On Home touch and hold the title in the History row.
- Choose Remove from History.
Smart TV
- On Home choose See all on the Recently watched row to open History.
- Choose Remove mode, press OK on each title to remove, then choose Done removing.
iPhone and iPad
- On Home open the menu of the History row (History options).
- Choose Clear History and confirm.
Android phone and tablet
- On Home open History options on the History row.
- Choose Clear History and confirm.
Smart TV
- Open the History screen from the Recently watched row on Home.
- Choose Clear history and confirm with Clear. Or open Settings, then Privacy, and choose Clear watch history and continue watching.
Clearing history keeps your favourites. On the iPhone, iPad and Android apps it also keeps where you stopped in each title. On the TV, the Settings route clears Continue Watching as well.
iPhone and iPad
- Touch and hold a channel, movie or series.
- Choose Add to Favorites. Favourites appear in rows on Home.
Android phone and tablet
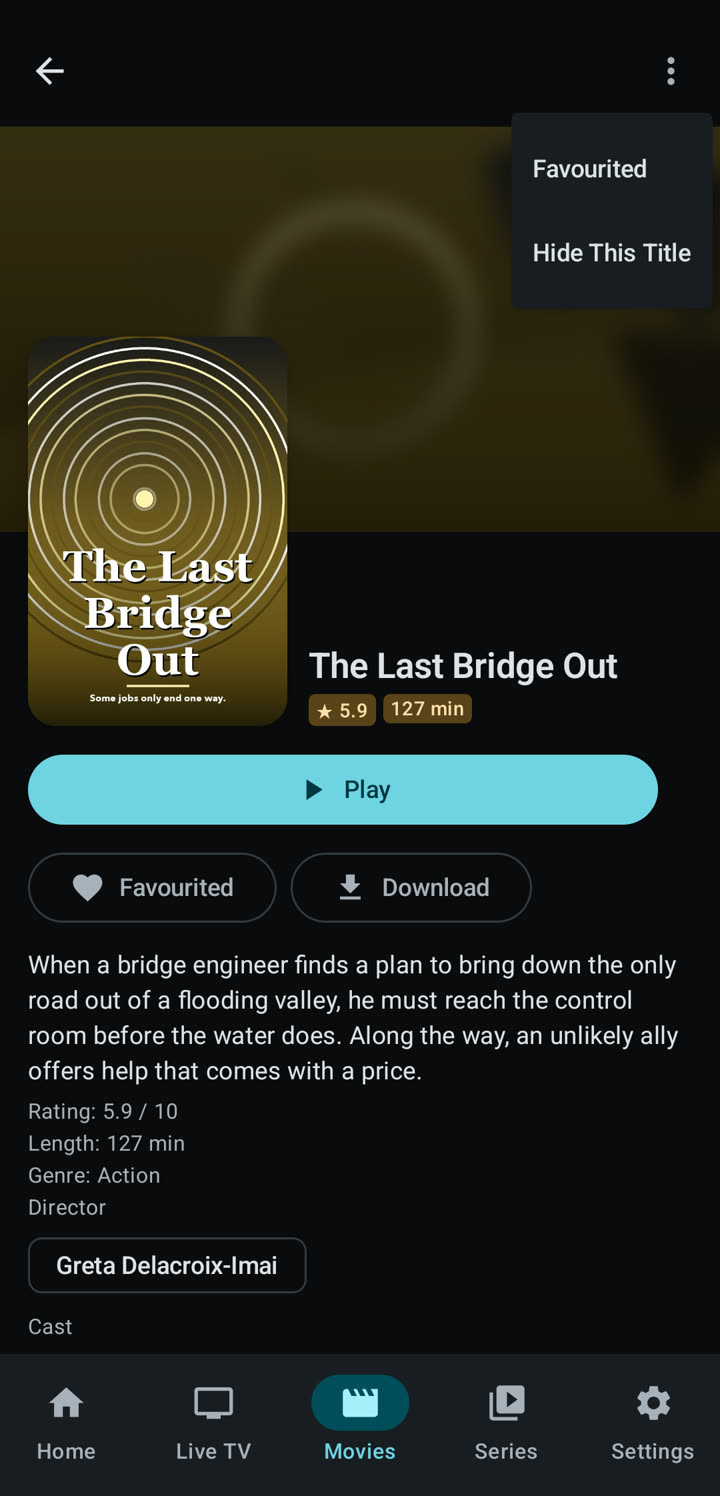
- Touch and hold a channel, movie or series, and choose Add to Favourites. Or tap Favourite on a movie’s page.
- Favourites appear in rows on Home.
Smart TV
- For a movie or series, open its page and choose Add to favourites.
- For a live channel, press OK while watching to show the bar, move to Favourite and press OK.
iPhone and iPad
- Touch and hold the title and choose Remove from Favorites.
Android phone and tablet
- Touch and hold the title and choose Remove from Favourites.
Smart TV
- On a movie or series page choose Remove from favourites. For a channel, use Favourite in the player bar again.
- Or open Favourites from Home, choose Remove mode and press OK on each item.
Smart TV
- Open Settings, then Privacy.
- Choose Clear favourites and confirm with Clear.
iPhone and iPad
There is no single button yet. Remove favourites one at a time (see the answer above).
Android phone and tablet
There is no single button yet. Remove favourites one at a time (see the answer above).
iPhone and iPad
- Touch and hold a title and choose Hide This Title.
- Or touch and hold a folder and choose Hide This Folder.
Android phone and tablet
- Touch and hold a title and choose Hide This Title. On a movie’s page, open More options for the same choice.
- Or touch and hold a folder and choose Hide This Folder.
Smart TV
- Open Settings, then Parental controls, then Hidden folders.
- Choose Live TV, Movies or Series, set each folder you want out of sight to Hidden, and choose Done.
The TV cannot hide a single title. A title or folder you hide on a linked phone or tablet is hidden on the TV too, if the hidden-titles sharing switch is on. Hidden items stay out of browsing, search and Home.
iPhone and iPad
- Open Settings, then Parental Controls, then Hidden Content. Enter your PIN if you set one.
- Tap Unhide next to an item, or Unhide All.
Android phone and tablet
- Open Settings, then Privacy and security, then Hidden content.
- Tap Show next to an item, or Show all and confirm.
Smart TV
- Open Settings, then Parental controls, then Hidden folders.
- Set the folder back to Visible and choose Done.
Parental controls, PIN and App Lock
iPhone and iPad
- Open Settings, then Parental Controls.
- Turn on Hide Adult Content.
Android phone and tablet
- Open Settings, then Privacy and security, then Parental controls.
- Turn on Hide adult content.
Smart TV
- Open Settings, then Parental controls.
- Turn on Hide adult content.
The filter is a best guess from titles and category names your provider gives, so it can miss a title or hide one that is fine. Until you set a PIN, anyone using the device can turn it off.
iPhone and iPad
- Open Settings, then Parental Controls.
- Tap Set a PIN, then enter four to six digits twice.
- Later, use Change PIN or Remove PIN here.
Android phone and tablet
- Open Settings, then Privacy and security, then Parental controls.
- Tap Set a PIN, enter four to six digits in PIN and Confirm PIN, then tap Continue.
- Later, use Change PIN, or Turn off parental controls to remove it. Your phone asks you to confirm it is you.
Smart TV
- Open Settings, then Parental controls, then the PIN row (Set PIN, Change PIN or Remove PIN).
- Enter four to six digits with the arrow keys and OK, then enter them again.
There is no PIN recovery: Zee2 has no accounts. After five wrong tries on the TV there is a wait that grows with each try.
iPhone and iPad
- Open Settings, then App Lock.
- Turn on the switch (Require Face ID, Require Touch ID or Require Passcode, depending on your device).
- Choose how soon it asks again with Ask Again After.
Android phone and tablet
- Open Settings, then Privacy and security, then App Lock.
- Turn it on and choose how soon it asks again with Ask again after. You need a screen lock set on the phone.
Smart TV
- Open Settings and choose Lock when the app opens. It uses your PIN, so it asks you to set one first.
- Choose Lock again after to set how soon it locks again.
On the TV, Forgot PIN? is the only way past the lock if you forget it, and it erases all app data on that TV.
Player, audio, subtitles and quality
iPhone and iPad
- Tap the screen to show the controls: play, pause, Skip back, Skip forward, the seek bar and Playback speed.
- Picture size cycles through fit, fill, stretch, 16:9 and 4:3. Gestures such as double tap to skip are in Settings, then Video Player.
Android phone and tablet
- Tap the screen to show the controls: play, pause, Skip back, Skip forward, Speed and Picture size.
- Picture-in-picture keeps the video in a small window. Gestures such as double tap to skip are in Settings, then Video player.
Smart TV
- Press OK to show the controls. Left and Right seek, and the play and pause key works as you would expect.
- Colour keys are shortcuts: red for Quality, yellow for audio and subtitles, green for channels, blue for info.
Speed, gestures and picture size are for phones and tablets. The TV has none of them. Volume and mute belong to the TV.
iPhone and iPad
- While playing, tap Audio track to pick a language.
- Tap Subtitles and choose a track, or Off. Load subtitle file… adds an .srt or .vtt file.
Android phone and tablet
- While playing, open Audio to pick a language.
- Open Subtitles and choose a track, or Off. Load subtitles from file… adds an .srt or .vtt file.
Smart TV
- While playing, press OK to show the bar and choose Audio and subtitles, or press the yellow key.
- Pick an audio language on the left and a subtitle track on the right, or Off.
The menus only offer what the stream carries.
iPhone and iPad
- Open Settings, then Subtitles.
- Choose Size, from 50% to 200%.
Android phone and tablet
- Open Settings, then Subtitles.
- Choose Size.
Smart TV
- Open Settings, then Text and interface size, and press OK to cycle through the sizes.
Subtitles that are part of the picture cannot be restyled.
iPhone and iPad
- While playing, tap Quality and choose Auto or a specific version.
Android phone and tablet
- While playing, open Quality and choose Auto or a specific version.
Smart TV
- While playing, press OK and choose Quality, or press the red key. Choose Auto or a version.
The Quality button only shows when the stream offers more than one choice.
iPhone and iPad
- While playing, tap AirPlay and choose the screen.
Android phone and tablet
- While playing, tap Cast and choose the device. Tap Stop casting to end.
Smart TV
A TV running Zee2 does not send anything. It can receive: use Continue on TV from a linked phone, or the AirPlay or Chromecast feature your TV maker provides.
Some formats cannot be cast, such as MKV files and downloaded titles on Android. With some players on iPhone and iPad, AirPlay sends only the sound.
Linking devices
No. The TV shows a code, your phone scans it, and both confirm the same number. There is no account, no email address and no sign-in. Linking is offered in app versions that include it.
Smart TV
- On the TV open Settings, then Devices, and choose Link this TV. A QR code and an eight-character code appear. They work once and expire in five minutes.
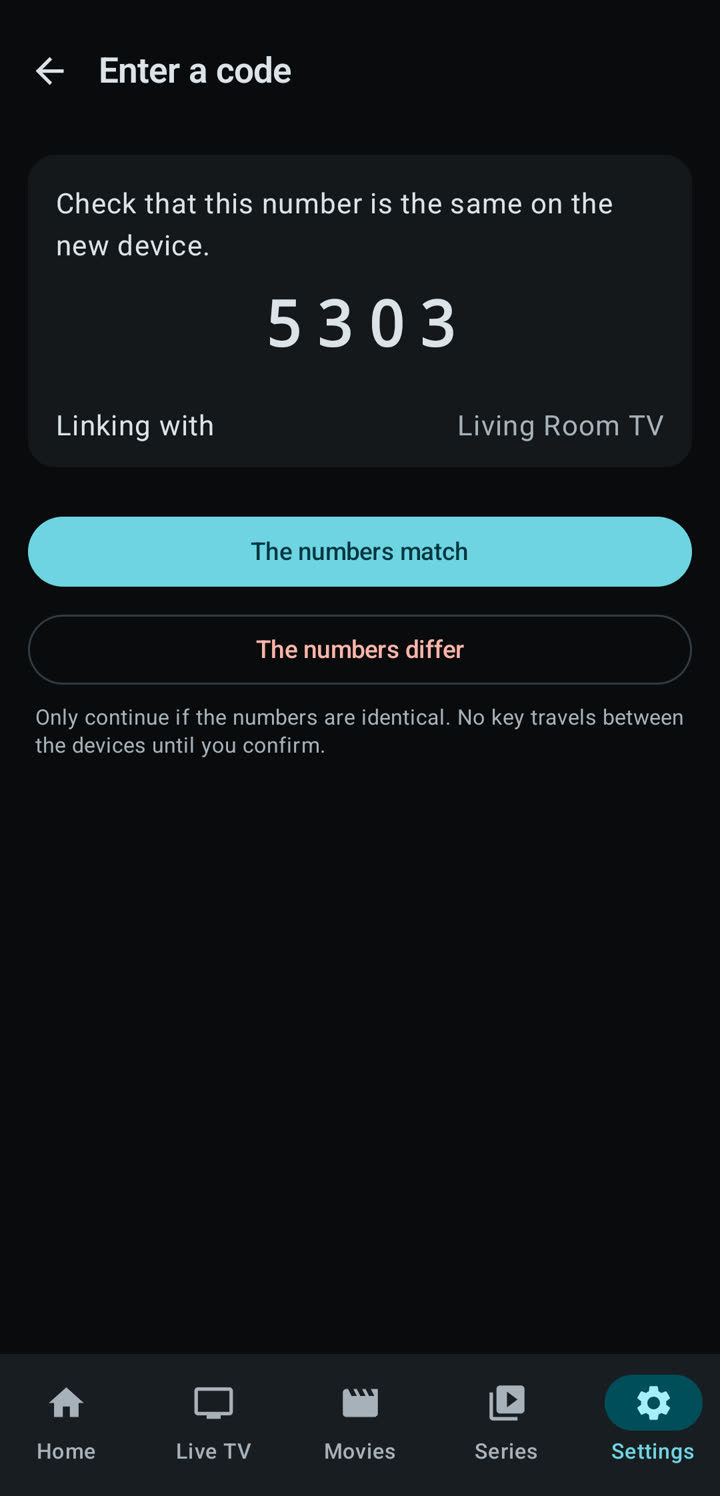
- Check that the number on the TV matches the one on the phone, then press OK. If the numbers differ, choose The numbers differ.
iPhone and iPad
- Scan the TV’s QR code with the Camera app, and it opens Zee2. Or open Settings, then Devices, and enter the code.
- Compare the number. If it is the same, tap The numbers match. If not, tap The numbers differ.
Android phone and tablet
- Scan the TV’s QR code with the Camera app. There is no scanner inside Zee2. Or open Settings, then Devices, then Link a device, then Enter a code from the new device.
- Compare the number. If it is the same, tap The numbers match. If not, tap The numbers differ.
Linked devices share only while both have the app open. Passwords are never sent between devices: each playlist arrives without its password and you type it once on the new device.
A group holds up to ten devices. A device belongs to one group at a time. A phone you link to a TV that already has a group joins that group, and the TV keeps its other devices. If both devices already have their own groups, the one that shows the code leaves its group and joins the other’s, and it tells you before you confirm.
iPhone and iPad
- Open Settings, then Devices.
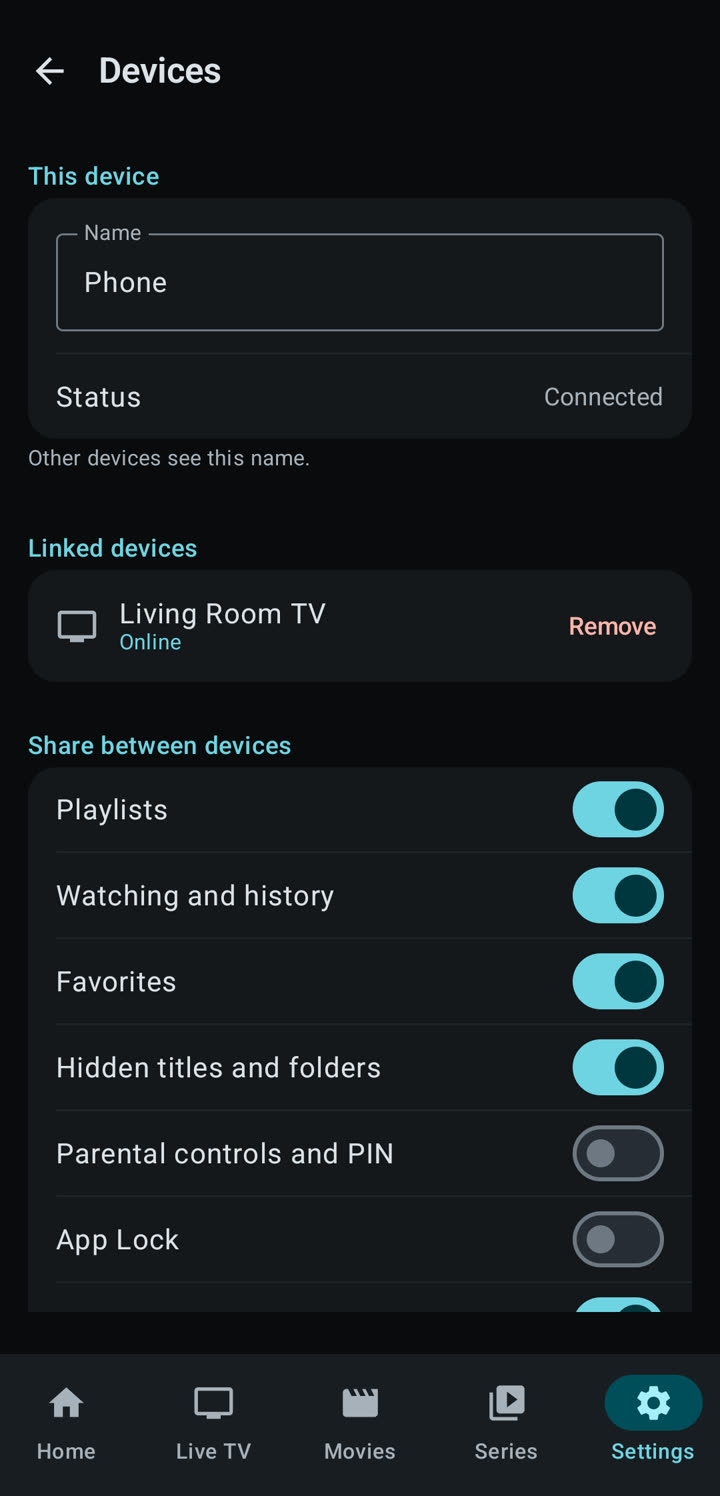
- To rename this device, edit Name under This device.
- To remove another device, swipe it in Linked devices and confirm with Remove. To leave, tap Unlink this device, then Unlink.
Android phone and tablet
- Open Settings, then Devices.
- To rename this device, edit Name.
- To remove another device, tap Remove next to it and confirm. To leave, tap Unlink this device, then Unlink.
Smart TV
- Open Settings, then Devices.
- To rename this device, choose Name and type a new one.
- To remove another device, choose Remove next to it and confirm. To leave, choose Unlink this device, then Unlink.
A device that was offline when you removed it has to be linked again.
iPhone and iPad
- Open Settings, then Devices, then Share between devices.
- Turn each kind on or off: Playlists, Watching and history, Favorites, Hidden titles and folders, Parental controls and PIN, App Lock, Order and sorting, Subtitles and languages and TV guide time shift.
Android phone and tablet
- Open Settings, then Devices, then Share between devices.
- Turn each kind on or off, the same nine as on iPhone and iPad.
Smart TV
- Open Settings, then Devices and the sync switches.
- Turn each kind on or off. A switch that is off neither sends nor receives.
Passwords, secret addresses, downloads and recordings are never shared.
iPhone and iPad
- Link the phone and the TV and open Zee2 on the TV.
- While playing on the phone, tap Continue on TV and choose the TV.
- The TV starts the title from the same minute. The phone becomes a remote: pause, jump 15 seconds, or Stop playing on that device.
Android phone and tablet
- Link the phone and the TV and open Zee2 on the TV.
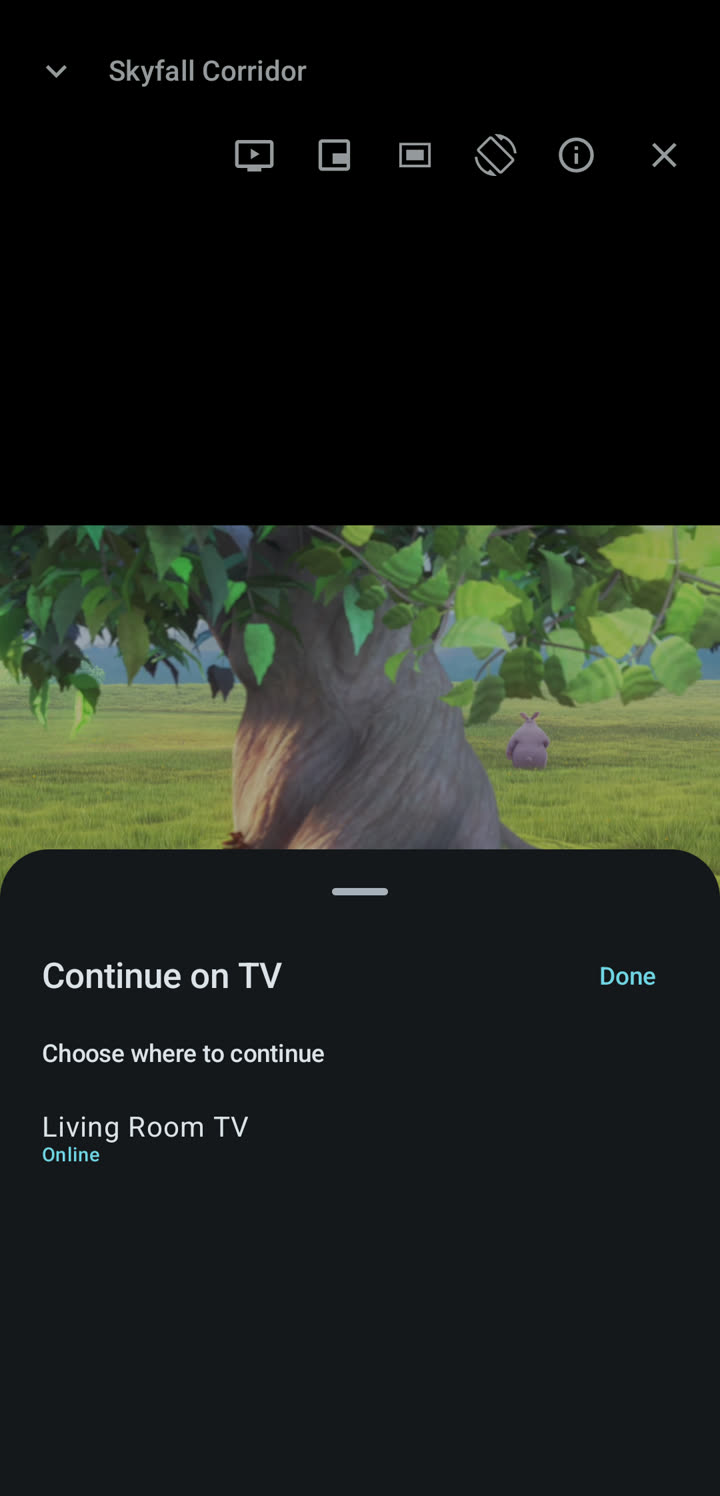
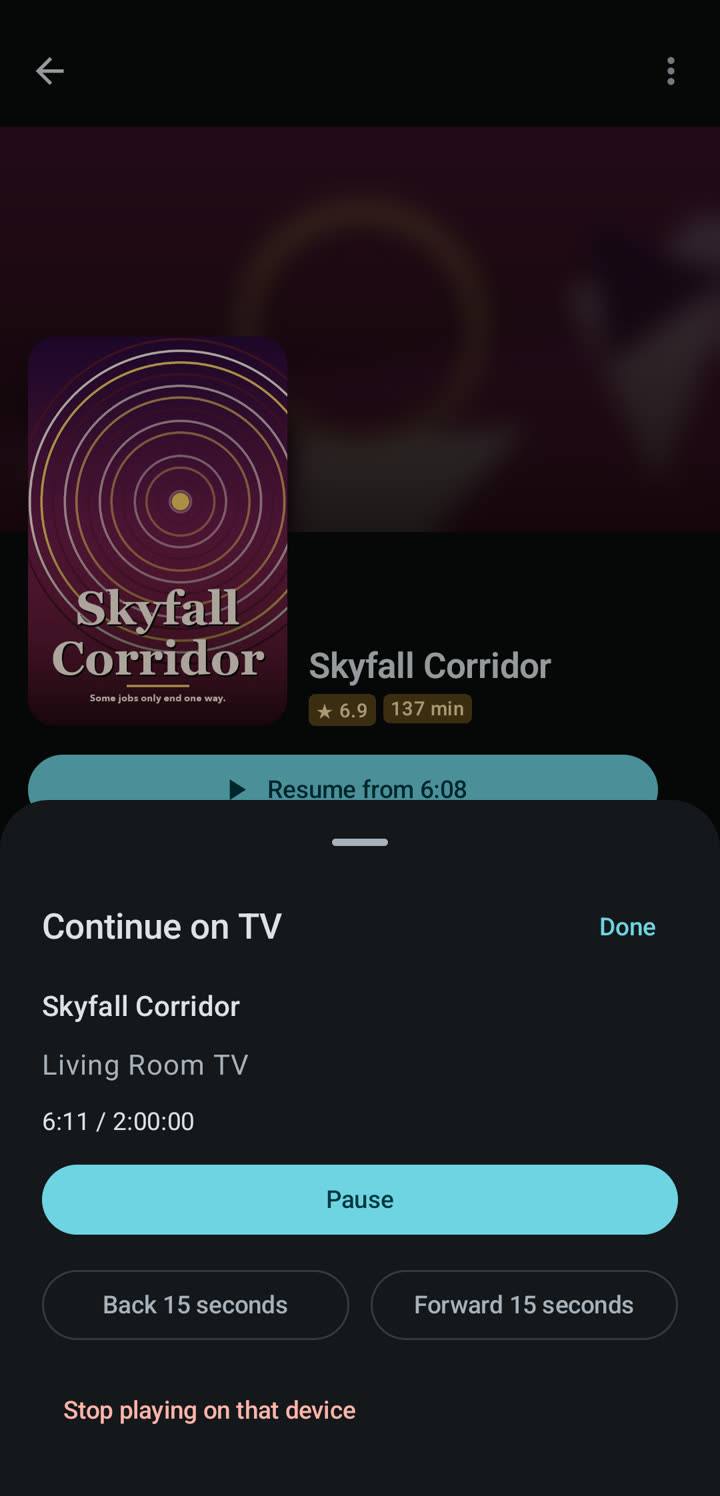
- While playing, tap Continue on TV and choose the TV from Choose where to continue.
- The TV starts the title from the same minute. The phone becomes a remote: pause, jump 15 seconds, or Stop playing on that device.
Smart TV
- Open Zee2 on the TV. A title sent from a linked phone starts by itself, and the controls say it resumed from the minute you were at.
- If the title is restricted, the TV asks for your PIN.
Zee2 must be open on the TV: a phone cannot switch a TV on or start the app. The TV plays its own copy of your playlist, so the playlist password must have been typed on the TV once.
All devices
- Link the phone and the TV and open Zee2 on both.
- On the TV open Search. The TV says you can type on your phone.
- On the phone a bar appears, saying you are searching on your TV. Type there, and the words appear on the TV. Tap the done button when you have finished.
Downloads and recording
iPhone and iPad
- Open the movie or episode’s page and tap Download. For a season use Download Season.
- Open Settings, then Downloads to see progress. Turn on the Wi‑Fi only switch there if you want downloads to wait for Wi-Fi.
Android phone and tablet
- Open the movie or episode’s page and tap Download. For a season use Download Season.
- Open Settings, then Downloads to see progress. Turn on Download over Wi‑Fi only if you want downloads to wait for Wi-Fi.
Smart TV
Downloads are for iPhone, iPad and Android phones and tablets. They are not on the TV.
Live channels cannot be downloaded. A download stays on the device and does not use your provider’s connections while you watch it.
iPhone and iPad
- Open Settings, then Downloads.
- Swipe a download and tap Delete. To remove everything, tap Edit then Delete All Downloads and confirm.
Android phone and tablet
- Open Settings, then Downloads.
- Tap Delete on a download. To remove everything, tap Delete all downloads and confirm with Delete everything.
iPhone and iPad
- Play a live channel and tap Record, then confirm Start recording. Recording uses a second connection from your provider.
- Tap Stop recording when you are done. Open Settings, then Recordings to play or delete it.
Android phone and tablet
- Play a live channel and tap Record.
- Tap Stop recording when you are done. Open Settings, then Recordings to play or delete it. Save a copy exports one outside the app.
Smart TV
Recording is not available on the TV.
Only live channels can be recorded, and only while you are recording. There is no scheduled recording. On iPhone and iPad the button is hidden if your account allows only one connection.
Settings, languages and privacy
iPhone and iPad
- Open the iPhone or iPad Settings app, choose Zee2 Player, then Language, and pick one. Or change the language of the whole device.
Android phone and tablet
- Open your phone’s Settings, then System, Languages, App languages, and choose Zee2 Player.
Smart TV
- Open Settings, then Language, and press OK on one.
Zee2 comes in English, Arabic, French, Spanish and Portuguese. Arabic is laid out right to left.
No account, no ads, no analytics and no crash reports. Your playlists, favourites and history stay on your devices. The only servers the app contacts are your provider’s, and our small linking server if you link devices. That server cannot read what the devices send each other. The full detail is in the privacy policy.
iPhone and iPad
- Open Settings, then Share Diagnostics, and tap Share Report. You choose where it goes.
Android phone and tablet
- Open Settings, then Share Diagnostics. You see exactly what is included, and choose where it goes.
The report has no username, password, provider address or stream links. Nothing is sent unless you send it.
Your provider limits how many devices can stream at once, and that count includes every phone, TV and box on your subscription. Stop playback on another device, or ask your provider about a plan with more connections.
Still stuck?Write to zeetwogroup@gmail.com. In the app, Share Diagnostics makes a report with your passwords removed. You choose where it goes.